A search of YouTube on the topic of Understanding Perspective for Photoshop Composting will produce several videos on perspective, most of which will explain how to use the various perspective tools in Photoshop like perspective warp, perspective crop and vanishing point. The videos do a very good job of explaining how to use the tools.
But what I find lacking is a good understand of how to determine the perspective for your background image and the cutout elements you are compositing together and an education on why it matters.
The Photoshop compositor can become excellent in the technical aspects of cutouts, lighting, color balance, matching depth of field, digital noise and all other aspects of compositing, but if the perspective of the elements added to the composite are not correct, the viewer will know there is something “just not right”, but they may not be able to determine what is wrong.
Over the next several articles, I hope to break down the topic of Perspective into ‘bite size’ topics and explore the topic from the view of the Photoshop compositor or illustrator. We will begin with just the basics of perspective and vanishing points on a horizon. Next, we will look at a few images and determine how to find the horizon and vanishing point within the image. We will also discuss general concepts of how to guess at the horizon when the image doesn’t provide any leading lines or clues to where the horizon might be, and will look at an example of placing a cutout element into various backgrounds that may or may not match based on whether the horizons of the two images can be aligned. Hopefully at the end of this series of articles, you will have a better understanding on how to handle perspective when you composite and always check for the perspective of your models and elements that you drop into your composites to ensure that they truly “fit the perspective” of your background.
At the end of this article are links to three YouTube videos that do a good job of explaining the topic of perspective in compositing and cover the full topic that I will break down over the next few articles. So let’s get started.
HORIZON and VANISHING POINT
Before we begin talking about our images and compositing, lets start with just an overview of perspective. If you have ever taken a formal drawing class, then you probably worked with perspective. But if you didn’t get to Photoshop compositing from an artist background, perspective might not be familiar ground.
When we convert our 3D world into a 2D space by either a drawing or photograph, we have to account for the 3rd dimension of space through perspective. Things further away from us are smaller and lighter, the angles of buildings are shifted, parts of objects that we can see up close we can’t see at a distance. These changes in distant objects are normal in 3D. So when we draw or composite, we have to account for these changes to keep our “composited worlds” looking real to the viewer and they get a sense of depth through perspective.
What really happens in our 3D world is that shapes converge toward their vanishing point on the horizon. Everything we see that has shape, has a point somewhere out in the distance where the lines of the shape converge into a single point; the vanishing point. This is known as linear perspective.
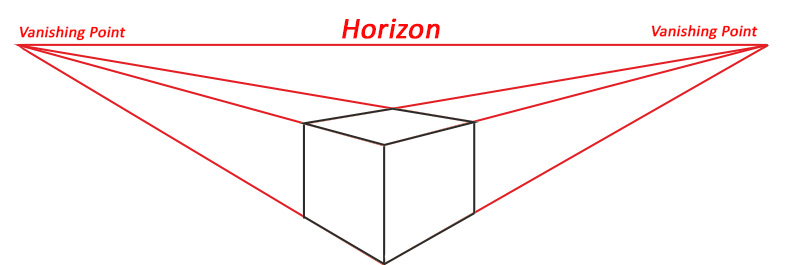
A scene may have a single vanishing point, 2 vanishing points or even three vanishing points. We will cover examples in a later article.
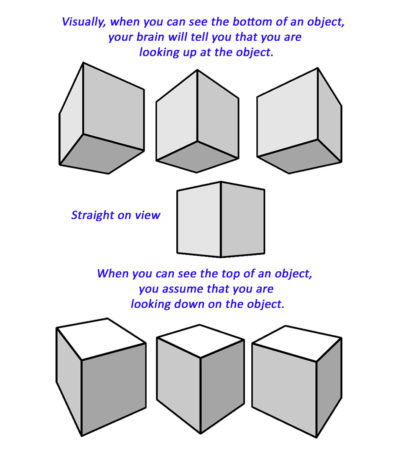
Depending on what sides of the objects in the scene are visible, you can determine if the elements are below or above the true horizon for the image. For example, in this image where you can see the bottom panels of the cubes, you can be certain that the viewer is looking up at the object. The middle object the viewer is probably eye level, while the bottom objects the viewer was probably standing above the objects and looking down. These cubes could represent any subject in your image. All of these objects would have 2 vanishing points on the horizon.
PHOTOGRAPHER AND CAMERA ANGLE
 As the photographer’s angle of view changes, so does the perspective and the relationship of the elements to the horizon. For example, if the photographer is holding the camera at eye level, the horizon is going to be somewhere close to the middle of the image. Elements extracted from photos captured from an eye-level point a view can be easily composited into a background that was also captured from the eye-level point of view. But if the background was captured at ground level, the perspectives will not match. We will demonstrate this in a later article. Remember, the horizon line is going to be based on where the camera is pointing.
Below is a quick graphic to help you remember the importance of camera angle and horizon. We will revisit this concept when we begin to examine images to determine their horizon and vanishing point in the next article.
Low Level Profile

When the photographer is low and shooting up, the horizon is going to be lower than normal, or below the midpoint of the image.
Looking Up Profile

When the photographer is shooting straight up, the horizon may be on the ground plane.
Looking Down Profile

When the photographer is high and shooting down, the horizon is going to be higher than the midpoint of the image.
Next Topic: Identifying Perspective in Images
APPENDIX
If you would like to get a start on more training on compositing with perspective, here are three YouTube videos I would recommend.
PTC https://www.youtube.com/watch?v=F4tu6uA5pjw&t=924s
PTC https://www.youtube.com/watch?v=OoHfZFl65fo
Tutvid https://www.youtube.com/watch?v=oZjHVVGTSY4
